January 12, 2014

I have MOVED!!!


Dear Readers!


This little ol' blog has made the big jump and become a grown up website!
To see the new site click here. There is a gorgeous new stationery store waiting for you too...
Lots of love


CityGirl


December 17, 2013

DIY Paper Christmas Tree


We are very short of space in out little apartment here in South Korea, but we still wanted to make things a little more festive and so we thought to use what we do have around the house...wall space. This is a super easy DIY for a sweet Christmas tree that requires no physical space. Place above a table to allow for plenty or room to put prezzies under...


December 12, 2013

Website Launching Soon!


I am launching my new website and online store very soon! If you want to be notified when I go live, just fill in the form here >>>> Subscibe to CityGirlSearching

Thank you!

x


December 11, 2013

Blogging Tips...Keeping your Blog Post layout consistent


Have you ever thought about the actual design (layout, image sizes, fonts, graphics) of your blog posts? 

Think about the blogs that your enjoy reading. What do you like about them? I'm sure they make it easy for you to find content, to scroll, the actual blog post content is easy to read (the font isn't so small that you have to squint at the screen to read the title) and the general layout of each post is visually appealing. This makes the whole experience of reading a blog enjoyable. There is nothing worse than finding a blog with great content, but it's hard work just to sift through it and read the actual message of their posts.

So today I am going to be sharing with you some tips for your own blog post design, as well as some resources to help you if you don't happen to have a graphic designer friend who makes you free elements for your blog...

1. Use a Mixture of Images and Text

This helps to break up the monotony of the black and white visual elements of a written piece. If I come across a blog post, no matter how interesting it may be, if it is just line after line of black writing I immediately switch off and head to the next blog. I am a very visual person, and am attracted to pretty pictures. That's not to say that you can't have long posts with only text in them. Take a little time to use spacing properly (the term used here is 'white space') which makes text easier to read. If you do use images that aren't your own, always make sure to reference properly. Look what happened to this blogger when she incorrectly sourced someone else work. 

Here is a useful tool for finding the source of an image called src-image bookmarklet (just copy the url of the image, which you can find by right clicking and selecting the 'copy image url' option) and pasting into the search bar.

Plain text can be thought provoking and look great when done right (look here at my friend Kerry from Midlands Musings who writes beautifully and makes me actually want to read through more than 3 sentences at a time).

The most important thing here is to plan your post before hand and decide whether you will be using pictures or text, or both, and think about how to make them look more appealing in a blog post.

{I use a lot of white space in my blog posts to make them easier to read}

2. Choose your fonts and stick to them

If you are using Blogger for your blog, you will have found the template editor to be your best friend when it comes to the customizing your blog. From there you have complete control over the colours of your text, the fonts, the font sizes and the layout of every element. The lovely Katrina over at PuglyPixel recommends limiting the number of fonts you use to no more than three (one for post titles, one for the sidebar titles, and another for the post body). Too many fonts tend to make a page look really busy. Additionally, when choosing fonts for your text, aim for legible fonts in a readable size. Whatever font you choose, keep legibility in mind. The most readable font under 14px is Verdana and larger than that, Arial is the most readable." PuglyPixel.

When I first stared blogging I changed fonts like the weather, and still do from time to time. But now that I am designing my new website, it's important for me to establish my branding and to keep it consistent, so readers are able to place my blog design with my brand. It will make your blog look more professional and cohesive.

Blogger has a whole range of different fonts built into it, so you can really get your hands dirty and get creative to ensure your blog stands out from everyone else's.

{I use 3 fonts, one for my blog posts, one for the blog post headings, and another for my header and sidebar labels}
3. Set a standard width for your blog post images

When something sticks out, you tend to notice it, and think that it must be a mistake. Keeping your image size in blog posts consistent helps with providing an overall professional and clean impression. You can use a free program like PicMonkey to change the size of your images. When I create graphics and edit my photographs for my blog, I always resize them to be 650px, that is the default size of my blog post. Doing this keeps everything neat and tidy. By also resizing your pictures you ensure that they download quickly when people open up your blog. You can also use a site like PhotoBucket to store your images and resize them before uploading to your blog.

To create collages like I do here on the blog you can either use a fabulous paid for program like Blogstomp (I use Blogstomp to resize all my images, create collages and add my watermark to all my photographs) or a free online editing program like PicMonkey.


These are a just a few tips to help you on your way. Pop on over to these lovely blogs to learn more:

InResidence "Amateur Blogging Tips"
AshleyEllaDesign "Creative Blogging Resources"

If you have any questions about blogging, or anything that you aren't clear about from the above tips, please pop me a comment below and I'll get back to you soon. Please also leave a comment if you have any other tips for making your blog posts pop!

Happy blogging everyone!

x

December 9, 2013

The FaceShop - Mango Seed Collection {review}


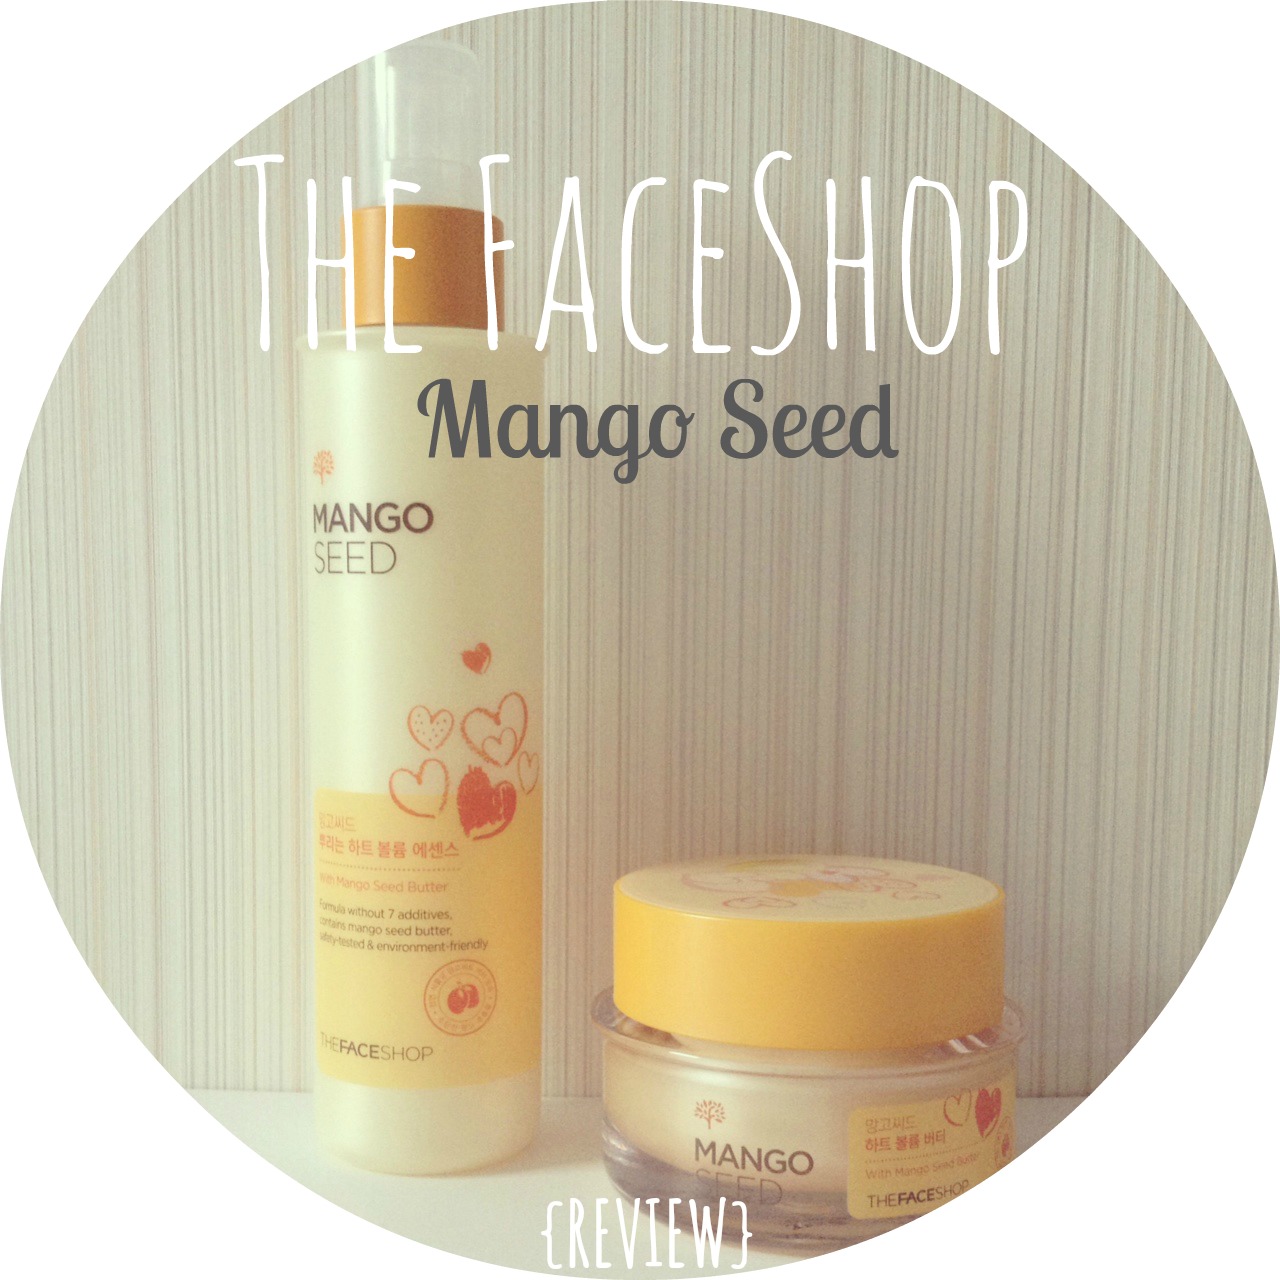
Following on the success of my last purchase of TheFaceShop skin care products (the Chia Seed Collection), I went ahead and bought two items in the Mango Seed collection. Well, to be fair on my purse, there was a fabulous promotion whereby upon spending an extra W2000 (about $2) for the cream, the store included a full size Mango Seed Essence. So I thought what the heck, I've never tried an essence before (it didn't matter that I had no idea what an essence was) into my little shopping basket it went.


Mango Seed Heart Volume Butter
This particular cream is the 'Heart Volume Butter' and apparently, when massaged into your skin while following a particular set of massage techniques (notice the picture above with those very specific moves lol) leaves your face plump and full of volume. Sounds amazing. But can it really be true? Most of the skin care products I have seen in stores here in Korea are sold alongside images of facial massage techniques and exercises, and patting and rubbing of the face. In essence, the more you massage the products into your skin, the more you are increasing the circulation, and, in a very small way, 'plumping' up your face and I guess, decreasing wrinkles. But, it's all a bit much for me. I already use a wide range of products on my face, I simply do not have time to make sure each one is applied with just the right amount of plumping and patting and massaging...but that's up to you :)

What the box promises:
Promise of mango seeds for Good Moisturization
1. Contains extracts of mango from Sudan (really?)
2. Contains ingredients obtained through fair trade
3. Moisturization and long lasting radiance
4. Say Goodbye to dry skin - 5 Solutions : puffiness, itchiness, poor absorption of makeup, poor elasticity, redness
5. Formulated without 7 additives (but what are these additives??)
6. Dermatologicallyt Tested

I was rather disappointed with the moisture content of this cream. It goes on beautifully, and smells amazing (this may or may not be a good thing for you, and you may not want to be smelling like a freshly picked piece of fruit all day). I say fruit as the fragrance was definitely not mango, but rather a light and fresh summery smell. I also had to use quite a lot of product to cover my whole face. As the jar only contains 50ml of product and goes for on average, a price of W22 000 a pop, you don't want to be having to restock after only a few weeks worth of use.

I found that my skin was better moisturized after the Chia Seed lotion (and lotions are technically a lot lighter than creams). I have read that for more moisture, you can apply cream after using lotion to combat extra dryness. I have combination skin, but winter has set in here in Korea and I always find the skin around my nose area gets dry very easily during this time of the year. Which is why I had such high hopes for the Mango Seed range (which is also more pricey than the Chia Seed range).
I now use this cream at night, in place of a night cream, and I do always wake up with very radiant looking skin (but that's probably more to do with the amount of water I drink and the number of hours of sleep I try to get).

I think this Volume Butter would be best suited to normal skin types, and for those people who are in the warmer seasons. It hasn't given me any extra moisture that I was hoping for, but does leave my skin feeling silky soft and smelling wonderful.


Mango Seed Spray Heart Volume Essence
I'm not entirely sure what this spray is supposed to do. There are no English instructions on the box it came in. I use it as a spray on toner to revitalize and add moisture to my skin. Alone I find it's not enough no that's it winter here. I spray it on my face straight after cleansing, and then apply a toner after, and then follow up with my SkinFood Black Sugar Skin Perfecting Serum (review to follow soon). It smells great, and definitely gets lapped up by my skin after cleansing. I haven't noticed any brightening or extra volume in my skin after the past few weeks of use. But, as it only cost me an additional $2 it was worth a try.

Are there any other Korean skincare brands that you enjoy using?

 I'd love to hear from you x

December 7, 2013

November through Instagram

So December is here, and has been for a week already. Goodness me. Christmas is now right around the corner. Have you got your Christmas gifts sorted yet? I'll be posting some online shopping ideas in the next few weeks, as well as some fun DIY ideas to get you in the festive mood. Have you been opening an advent calendar to count down the days? Have a look at this fun DIY I got up to a few weeks ago.

AND it's nearly all systems go for my new website and store! Feels like I have been talking about it for months (well, I really have) but not the day is nearly here...I am so excited to share with you a whole new level of pretty-ness. 

Watch this space!
x

Here is a little look back at some Instagram snaps from November...our trip to see the Autumn leaves, I wrote all about blogging and where to begin in our {Creative Business} series started by my fellow blogger friend Caitlyn, and of course stationery, stationery and more pretty stationery...


December 6, 2013

Goodbye Mandela

Today is a sad day. 

In the greater scheme of things, writing about my new favorite skin care product seems a bit trivial. 

So I'll leave you all with just this...


Rest in Peace Madiba.